Improve Your Balance for Terrain Park Features
Riding rails, boxes, and other terrain park features require precise control of board and body, as well as improved awareness and control of your edges. Ultimately, you’ll need to get into the terrain park to develop these skills, but to set you up for success, here are five exercises to develop the specific fitness you’ll need. Get ready for some single-leg work mixed with exercises for balance and body awareness, demonstrated by Burton team athletes Anna Gasser and Luke Winkelmann.
- Single-leg Balance: 30 Seconds per side
- Skater Jumps: 8 Reps per side
- Single-leg Romanian Deadlift (RDL): 8 Reps per side
- Wall Sit with Hip Shift: 30 Seconds per side
- Balance Board or Pillow Squat Holds: 30 Seconds
1) Balance & Coordination Exercises: Single-leg Balance
Performing a single-leg balance is a simple and effective way to improve body awareness, strengthen stabilizer muscles, and develop your coordination, all important elements for terrain park features like rails and boxes. Single leg balances also help promote symmetry, working to correct imbalances between your dominant and non-dominant legs. As snowboarders, we all need this.
How to do a Single-leg Balance: Step-by-step Instructions
Step 1: Begin standing tall with your feet hip-width apart and arms at your sides.
Step 2: Shift your weight onto your right foot while keeping your spine as straight as possible.
Step 3: Lift your left foot off the ground, keeping your toes pointed up and your hips level. Don’t lean, remain standing tall with a straight spine.
Step 4: Hold this position for 30 seconds, then lower your leg and perform the same balance on your other side for an additional 30 seconds.
2) Balance & Coordination Exercises: Skater Jumps
Also known as lateral bounds, skater jumps are a cardio-forward exercise that helps riders develop power and agility while strengthening the glutes, quads, hamstrings, and calf muscles. Skater jumps also help develop balance, control, and coordination, three important fitness qualities you should focus on if you enjoy spending time in the terrain park.
How to do Skater Jumps: Step-by-step Instructions
Step 1: Begin in an upright position with your feet hip-width apart, knees slightly bent and core engaged. Have your hands roughly held at chest height with your elbows bent.
Step 2: Push off your right foot, jumping laterally to the left. Land softly, absorbing the momentum with your left foot. Your right leg and foot can momentarily touch down next to your left foot to help stabilize your body.
Step 3: Without stopping, immediately reverse the motion, jumping laterally back to the right, landing gently on your right foot, touching your left foot momentarily to help stabilize your body.
Step 4: Repeat the movement, jumping laterally to the left, then right, for 8 repetitions per direction. You can increase the difficulty by holding 12-ounce weights in each hand
3) Balance & Coordination Exercises: Single-leg RDL
The single-leg Romanian deadlift, also known as the RDL, is snowboard fitness gold. Seriously, everyone should be doing these, whether they like terrain park features or not. The benefits of the single-leg RDL are many, including strengthening the glutes, hamstrings, and lower back, while also increasing single-leg stability and hinge mechanics. Keep in mind that the single-leg RDL isn’t a beginner’s movement; you must maintain proper form to reap the benefits of this single-leg snowboard exercise. We recommend familiarizing yourself with the standard RDL movement if you’ve never done one, then moving onto the single single-leg movement when you feel ready.
How to do a Single-leg RDL: Step-by-step Instructions
Step 1: Begin standing tall with your feet hip-width apart.
Step 2: Shift your weight to your right leg, letting your arms hang by your sides while you engage your core.
Step 3: Hinge at the hips (keep your back flat, not rounded), letting your torso and arms move downward, toward the ground. Simultaneously, let your left leg come back behind your body, counterbalancing your torso. It is very important that as you hinge forward, your pelvis remains level.
Step 4: Pause for a moment at the bottom of the hinge before reversing the movement, coming back to a standing position.
Step 5: Perform 8 reps per side.
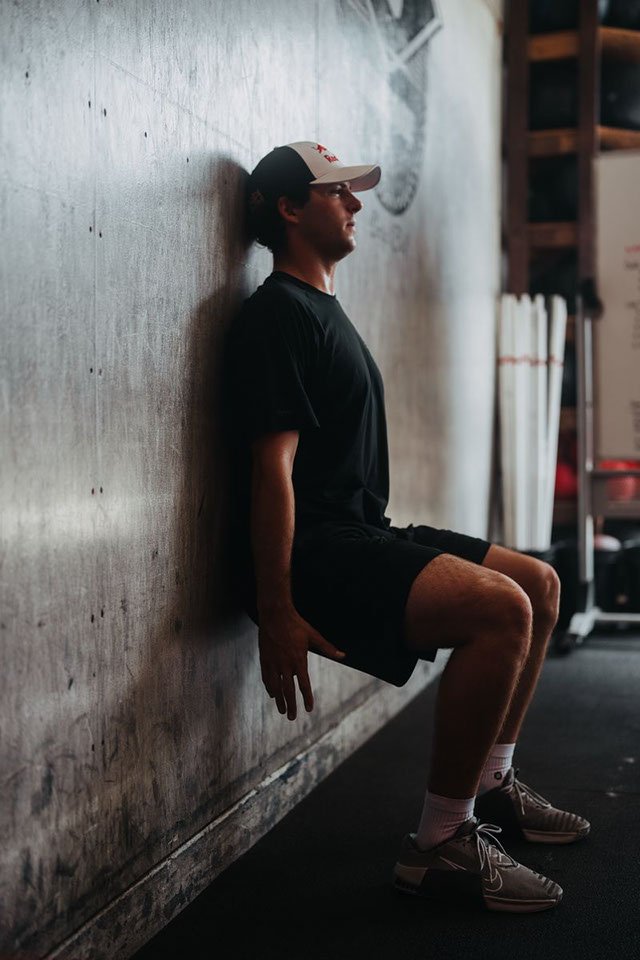
4) Balance & Coordination Exercises: Wall Sit with Hip Shift
The wall sit is a classic exercise for building glute, quad, and core strength that can be performed just about anywhere. At Burton, we like to add a hip shift to this exercise to more closely duplicate the asymmetrical loads we experience when snowboarding. This boosts its benefits for all riders, whether you’re into freestyle riding or not.
How to do a Wall Sit with Hip Shift: Step-by-step Instructions
Step 1: Find a wall and begin standing with your back flat against it. Position your feet roughly two feet in front of you, shoulder-width apart.
Step 2: Slide down the wall until your knees reach a 90-degree angle, with your thighs parallel to the floor. Keep your core engaged and maintain contact between your back, head, and the wall. Your knees should remain in line with your toes.
Step 3: Initiate the hip shift; slowly move your pelvis to the right feeling more weight on your right leg while keeping both feet flat on the ground. The right leg should bear about 80% of the load and the left leg 20%.
Step 4: Remain in the weight-shifted position for 30 seconds before coming back to center.
Step 5: No repeat the shift, this time to the left, and hold for another 30 seconds.
5) Balance & Coordination Exercises: Balance Board or Pillow Squat Hold
Balance boards are great for developing balance, coordination, lower body strength, and stability. We especially love balance boards because they're just plain fun, and who doesn’t want to have MORE fun?
If you own a balance board, great, but if not, don’t sweat it. You can do a pillow squat hold instead and get similar benefits; you’ll just need a firm pillow, yoga block or sports ball.
Using a Balance Board or Doing a Pillow Squat Hold: Step-by-step Instructions
Balance Board: If you own one, jump on it for 30+ seconds at a time. Keep the deck centered, or you can shift the deck back and forth on the roller, pausing at the ends of the deck while keeping it level.
Step 1: Grab a pillow, yoga block, or sports ball of your choice and hold whichever prop you have chosen between your knees. Your goal is to avoid dropping it, but don’t squeeze it overly aggressively, just hard enough to keep it in place.
Step 2: Begin in a standing position, with your feet set a little bit wider than shoulder width. Your toes should be pointed slightly outward.
Step 3: Begin lowering into a squat, bending at the knees and waist while lowering your hips toward the floor. You should aim to get your thighs parallel to the ground at the bottom of the squat. Maintain a tight core.
Step 4: Once you get to the low point of the squat, hold for 30 seconds, squeezing your knees together to activate the inner thighs.
Step 5: Slowly return to your original standing position, take a beat, then repeat the squat four more times.